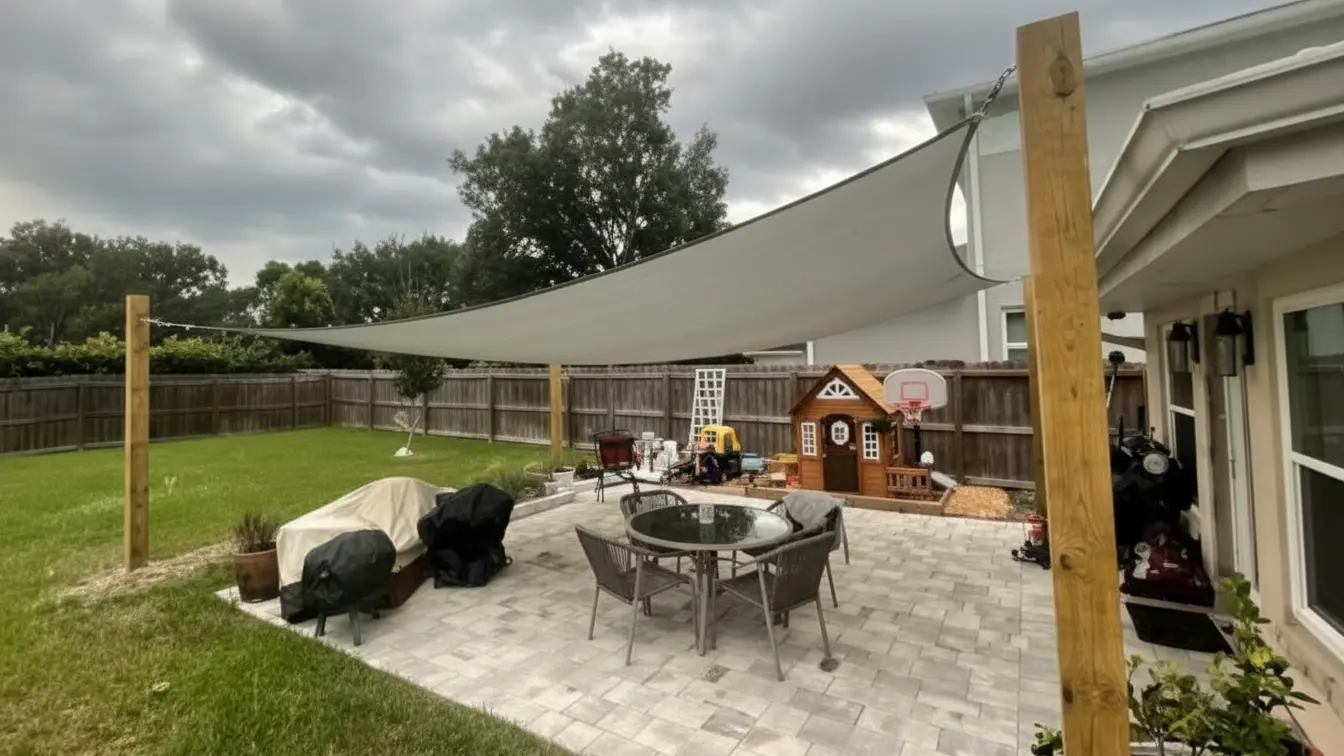
Installing a sun shade sail can transform your outdoor area, but mistakes with tension, slope, or anchor placement often lead to sagging or fabric damage. Many homeowners struggle with ensuring their setup remains secure and weather-resistant over time.
This guide walks through site preparation, measuring and planning, and step-by-step installation, helping homeowners create a durable, properly tensioned shade sail that delivers lasting protection and a clean, professional finish.
Preparing Your Site and Tools
Preparing your site and tools for shade sail installation requires clearing the area of obstacles, checking for underground utilities, obtaining necessary permits, and gathering essential measurement and installation equipment. Proper site preparation is the foundation for a safe, compliant, and structurally sound installation.
Before beginning your sun shade sail installation, the preparation phase sets the tone for safety and long-term reliability. Each step — from site inspection to tool setup — ensures your structure remains secure and compliant with local codes.
Permit and Compliance Requirements
Every community has specific rules about mounting or constructing outdoor structures like shade sails. These may cover location, maximum height, and anchoring style. Ignoring them could lead to fines or mandatory removal of your installation.
- ⚠️ Confirm permit requirements with your local building department to avoid penalties or forced dismantling.
- ✅ Understand your region’s placement, height, and anchoring regulations in advance.
- 💡 Schedule a consultation early to check property line and setback restrictions.
In our experience, resolving approvals before installation saves both cost and time, especially for permanent or semi-permanent mounts.
Site Clearance and Utilities Check
Clearing the area and checking below ground avoids damages and installation delays. A clean, stable surface helps ensure post alignment and proper tension across the fabric.
- ✅ Remove vegetation, debris, or other obstructions from the working area.
- ⚠️ Use local 811 utility location services to identify buried electrical, water, or communication lines.
- 💡 Protect your setup by maintaining a minimum clearance around underground lines to prevent costly accidents.
Foundation and Structural Preparation
Strong foundations and correct alignment are essential for handling tension and wind stress. Columns and anchor points should be reinforced to maintain the sail’s stability over time.
- ✅ Pour concrete footings at least 6 inches thick and allow 48 hours for curing before installing posts.
- 💡 Use templates or string guides to align anchor bolts accurately.
- ⚠️ Inspect existing structures to confirm they can withstand fabric tension and local wind conditions.
- ✅ Opt for load-rated 316 stainless steel hardware for enhanced lifespan, particularly in commercial or coastal areas.
Essential Tools for Installation
Having the right tools streamlines measurement and alignment, improving both efficiency and the professional finish of your installation.
- ✅ Measuring tape and spray paint for precise marking of post locations.
- 💡 Torpedo level to ensure posts are perfectly upright.
- ⚙️ Tensioning tools for evenly tightening fabric and preventing sagging.
- 🔩 Use load-rated 316 stainless steel fittings and brackets that meet commercial-grade safety standards.
Patiofurnituresco often recommends having a torque wrench on hand to verify every fitting meets the exact tension your sail fabric requires.
Considerations for Wind Load and Weather
Outdoor structures must be engineered for environmental changes such as wind gusts or sudden storms. Factoring in local meteorological data ensures lasting performance and user safety.
- ⚠️ Assess typical wind speeds and directions at your specific property.
- ✅ Add reinforcing anchors, support posts, or extra tension cables if you’re in a high-wind area.
- 📋 Verify your structure complies with municipal wind load resistance standards during the permitting process.
- 💡 Design flexibility into the sail system so tension can be adjusted during severe weather events.
Following these steps keeps your shade sail secure, weather-resistant, and compliant—creating a safe and professional-quality installation for residential or commercial spaces.
Measuring and Planning Your Shade Sail Installation
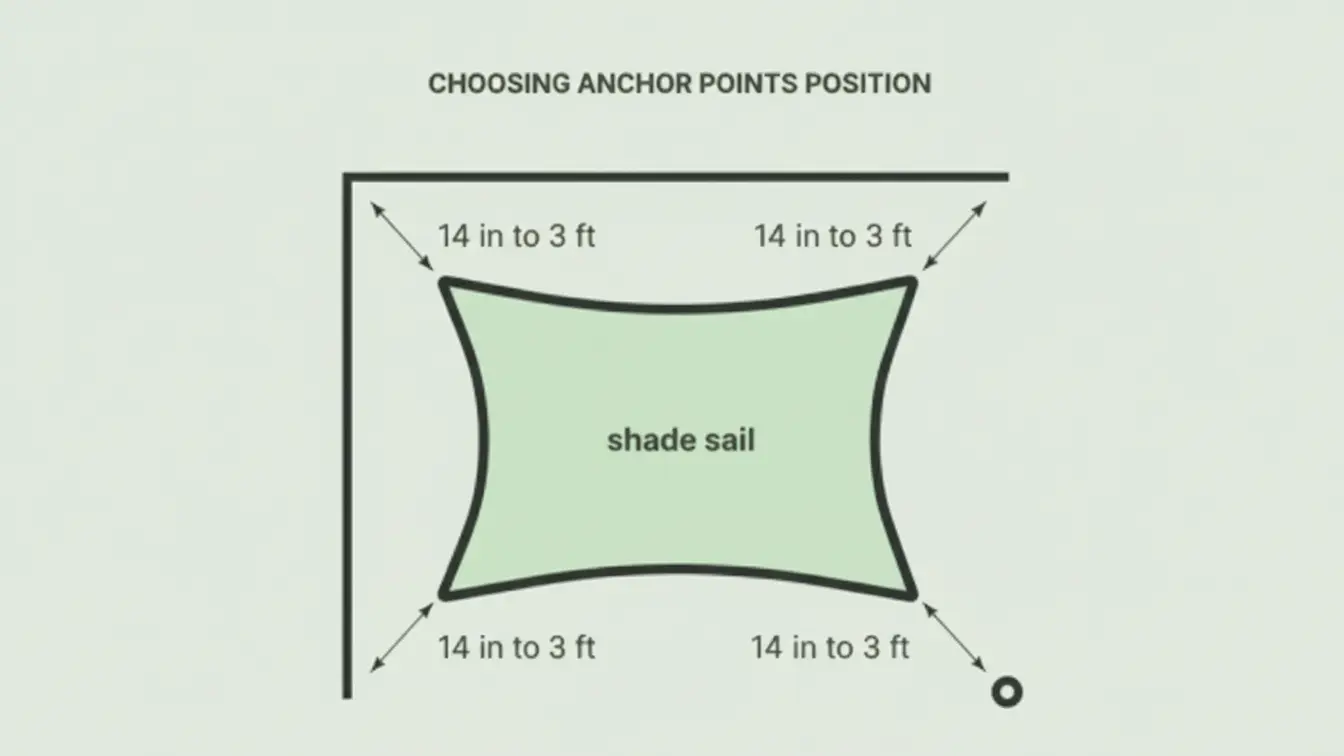
Accurate measurement of anchor points with millimeter precision and accounting for height differences and tensioning space are essential for a proper shade sail fit. Measure the straight-line perimeter between mounting points and allow 1–3 feet of slack per corner to ensure correct tension and the desired curve.
Proper measurement and planning are the foundation of a successful sun shade sail installation. In our experience, even small measurement errors can impact sail tension, alignment, and weather resistance, making careful preparation critical before fabrication or mounting begins.
Measurement Basics: Accuracy and Methods
Start by accurately measuring the distances between all anchor points. Most shade sails connect to 3–5 anchors such as posts, walls, or beams. The fiberglass measuring tape should be pulled tight to ensure no sag during measurement.
- 📏 Measure directly between anchor points using a fiberglass tape for maximum precision.
- 💡 Maintain accuracy to within 10mm to avoid fitting or tensioning issues.
- ⚙️ Take perimeter measurements from eyebolt to eyebolt, excluding extra hardware like turnbuckles.
- 📐 Record height differences based on the lowest anchor point for correct 3D fitting.
These steps help you design a taut, well-shaped sail that fits perfectly across its intended area.
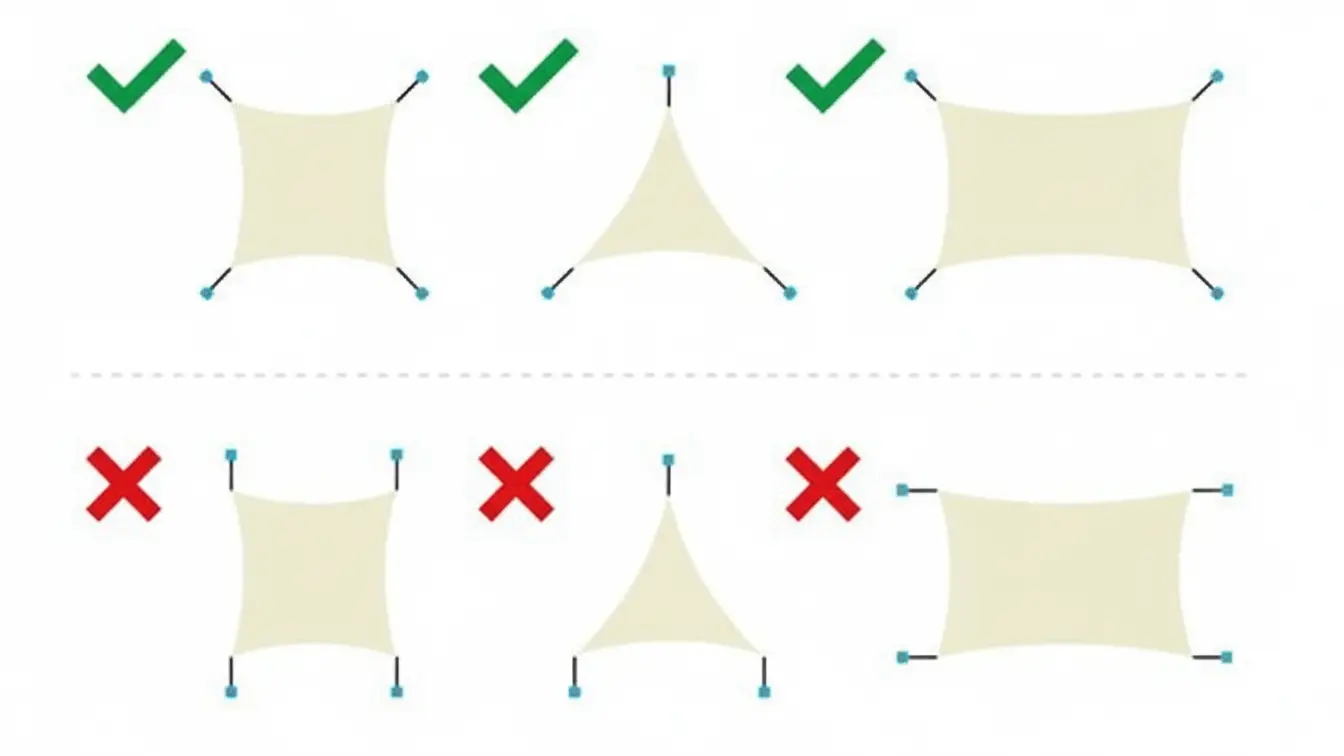
Tensioning Space and Sail Curve
Every shade sail must include room for proper tensioning. Without it, the fabric may stretch unevenly or fail under strong wind.
- 📏 Allow 1–3 feet (0.3–0.9 meters) of slack at each anchor point.
- 🌤️ Expect a sag or curve of about 6–12 inches across each span for strength and airflow.
- 💪 Proper slack prevents fabric overstress, extending the life and stability of the sail.
This balance between tension and flexibility is what gives the sail its characteristic 3D curve and resistance to uplift during wind loads.
Planning Anchor Points and Installation Sequence
Anchor point selection heavily influences stability and appearance. Always identify strong, load-bearing structures before taking measurements.
- 🏗️ Choose anchors such as walls, posts, or mature trees that can handle continuous tension.
- 📏 Measure the straight-line distance between anchors and ignore nearby obstacles or angles.
- 🔩 Plan installation in sequence from one corner outward to maintain consistent tensioning.
- 💡 Use turnbuckles strategically: 3 for sails with edges up to 27m, and 4 for larger setups.
Organized installation planning makes tensioning smoother and prevents uneven forces on any corner.
Common Measurement and Planning Mistakes
Many installation issues stem from simple measuring errors or skipped planning steps. Avoid the following problems to ensure a smooth build:
- ⚠️ Measuring around obstacles instead of directly between anchors.
- ⚠️ Ignoring anchor height differences, causing wrinkles or sagging.
- ⚠️ Forgetting to plan installation sequence, leading to poor overall tension.
- ⚠️ Underestimating necessary slack for the desired sail curvature.
Catching these mistakes early saves time, money, and adjustments later in the project.
Professional Consultation and Value
For complex or large installations, a professional can help guarantee precision and performance. In our experience, expert consultations often prevent costly remakes.
- 👷♂️ On-site specialists can review your measurements and advise on design options.
- 💼 Consultation fees start around $250 but often save much more by avoiding fabrication errors.
- 🧭 Installers typically use CAD modeling to factor in height, angle, and tensioning data for perfect fitment.
That level of technical accuracy ensures your sun shade sail installation performs well under daily outdoor conditions and maintains its shape for years.
Step-by-Step Installation Process
Installing a shade sail involves five core steps: selecting the location and marking anchor points, attaching mounting hardware, connecting hardware to anchor points, hanging the sail, and tensioning using turnbuckles to ensure a tight, crease-free finish.
A well-planned sun shade sail installation ensures the structure remains secure, weather-resistant, and visually appealing. This guide walks through each stage, from preparation to final tensioning, with practical specifications and safety notes.
Preparation and Planning
Before beginning, take time to evaluate your site and confirm structural readiness. In our experience, early checks prevent costly rework or safety issues later.
- 💡 Assess structural integrity of all fixing points including fascia, posts, trees, or existing structures.
- ⚠️ Check local building codes and obtain necessary permits before any drilling or digging.
- ✅ Locate underground utilities with local authorities before digging post holes to avoid damage.
Planning ensures your anchor points align properly, giving the sail correct shape and tension once installed.
Mounting Hardware Installation
Anchor point selection influences performance and durability. Each mounting scenario may require specific materials or anchoring techniques.
- 💡 Fascia mounting must be securely supported by rafters or trusses.
- ⚠️ Tree attachments should only be temporary and used on trunks of 250mm+ diameter.
- ✅ When using new posts, embed them in concrete footings. For firm ground, dig holes 400mm × 400mm × 800mm deep with a 100mm gravel base.
- For soft ground, add a 100mm concrete pad beneath posts.
- 🕒 Allow concrete to cure for at least 48 hours; slope the surface away from posts to prevent water pooling.
Connecting Hardware and Hanging the Sail
After brackets and anchor points are in place, attach the hardware and hang the sail before applying tension. This helps balance the load evenly.
- ✅ Use 3/8″ × 5″ eye bolts and ¼” × 2-3/8″ carabiners as standard connection hardware.
- 💡 Ensure all fixing accessories face toward the sail’s center for uniform stress distribution.
- ⚙️ Hang the sail evenly without twists or tangles before tightening.
This preliminary setup ensures even tension during adjustment and prevents premature wear along the fabric edges.
Tensioning and Final Adjustments
Gradual, even tensioning extends fabric life and maintains a smooth, stylish appearance. Use a ratchet or turnbuckle to fine-tune pulling strength.
- ✅ Use ratchet tensioning tools to progressively tighten each corner until the fabric feels firm and crease-free.
- ⚠️ Avoid over-tensioning to prevent damage to the fabric or mounting hardware.
- 💡 Inspect and re-tension periodically as the fabric naturally settles over time.
Balanced tension ensures proper rain runoff and reduces fluttering in high winds.
Material Specifications and Tools Required
Selecting reliable materials and using proper tools make a noticeable difference in long-term performance. These recommendations come from years of installation experience in various climates.
- ✅ Recommended post materials: H5 treated softwood, Class 1 hardwood, or galvanized steel for maximum durability.
- ⚙️ Essential tools: tape measure, level, pencil, drill, wrench, ladder, and ratchet set.
- 💡 Connection options: D-shackles, steel wire, rope, or chain, depending on site layout and tension needs.
Choosing corrosion-resistant hardware and treated materials enhances structural strength and extends the lifespan of your sun shade sail setup.
Maintenance and Safety Considerations
Keeping your installation safe and secure ensures years of use with minimal issues. Establish a simple inspection routine every few months.
- ✅ Check all mounting points and hardware regularly for signs of wear or looseness.
- ⚠️ Avoid contact with chemicals like chlorine, which may degrade the sail fabric. Always follow manufacturer care guidelines.
- 🔥 Do not place barbecues, open flames, or heat sources under the shade sail for fire safety.
Proper maintenance and awareness extend the lifespan of the installation, helping you enjoy a reliable and attractive shaded area season after season.
Elevate Your Outdoor Spaces with Durable, Customized Shade Solutions
Partner directly with Patiofurnituresco to access premium commercial umbrellas engineered for longevity and style—with full OEM/ODM customization and low MOQs. Unlock global logistics and cutting-edge innovations designed to boost your market presence risk-free.

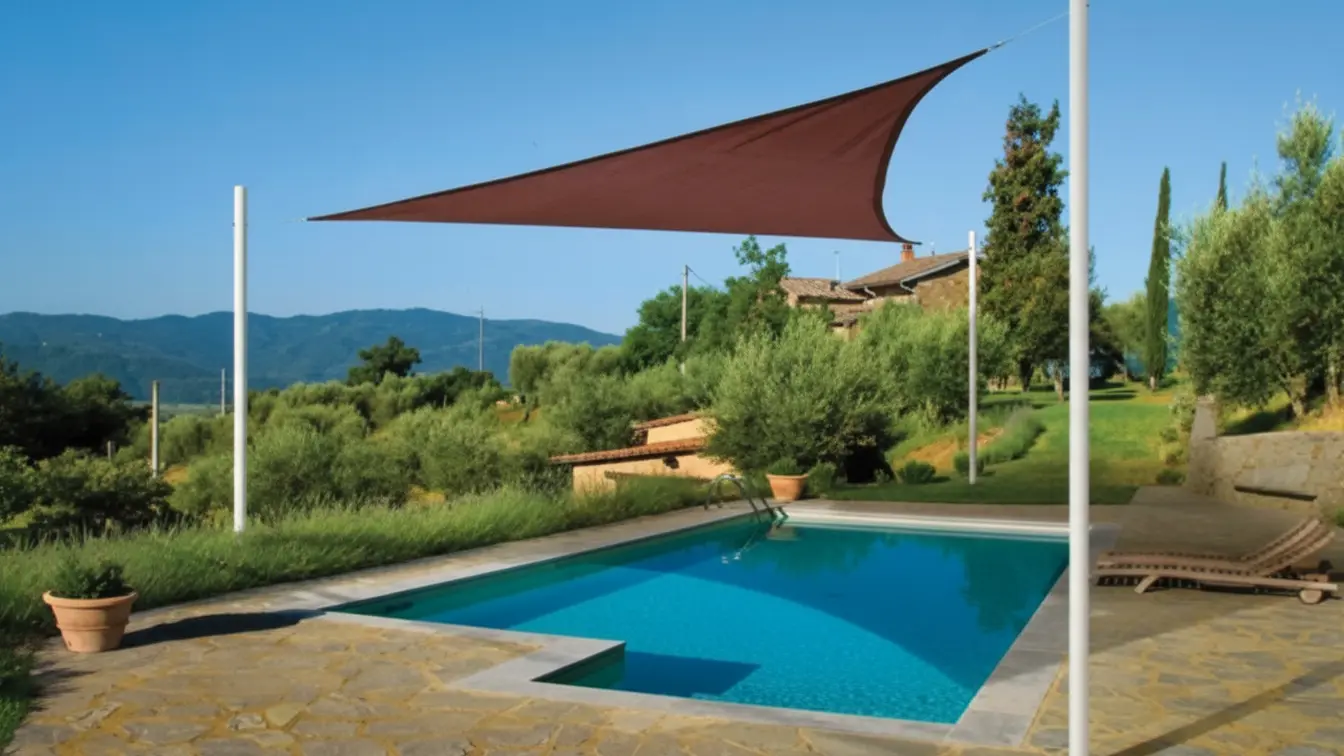
How to Prevent Water Pooling and Ripping
Water pooling on shade sails happens because of inadequate slope, poor tension, or low-quality materials. Prevent it by installing sails with a slope of at least 30°, ideally 35-40°, applying even pre-tension of 10-15%, and performing regular maintenance to ensure water drains away from the sail center.
Proper sun shade sail installation is key to keeping your shade structure secure and preventing early wear. In our experience working with outdoor projects, careful attention to slope, material, and upkeep makes the difference between a long-lasting setup and one that fails after a single rainy season.
Key Design Principles for Water Runoff
Designing a shade sail that prevents water pooling comes down to controlling three factors—slope, tension, and directional drainage. Each element plays an important role in moving water safely off the canopy surface.
- 💡 Maintain a minimum slope of 30°; a recommended 35–40° ensures effective water runoff.
- ✅ Apply an even pre-tension of 10-15% on every corner to prevent sagging and surface dips.
- ⚠️ Lower at least one corner significantly to direct water flow toward that point.
- 🚀 Combine proper tension and slope so water slides off naturally, similar to well-laid roof tiles.
Material Quality and Its Impact
The choice of fabric determines how long the sail holds its shape and resists water-related damage. Premium fabrics not only manage water effectively but also stand up better to sun exposure.
- ✅ Reinforced HDPE fabrics with anti-tear strength of at least 800N and UV blocking above 95% are ideal for outdoor conditions.
- 💡 Choose materials with long-term stretch rates under 2% to keep tension consistent and avoid sagging.
- 🚀 High-quality sails typically last around 5 years, while lower-grade materials may deform or tear within months.
- ⚠️ Once pooling starts, fabric UV protection can drop by up to 75%, accelerating surface wear.
Maintenance Practices to Extend Sail Life
Even the best-installed sail needs hands-on care to perform well over time. Maintenance helps protect both the hardware and fabric from stress and accumulation damage.
- ✅ Clean the sail monthly to remove debris and prevent water blockage.
- 💡 Recheck and fine-tune tension every 3–6 months to maintain the designed slope.
- 🚀 Adjust tension seasonally—increase during the rainy months and ease in winter to avoid overstretching.
- ⚠️ Add temporary supports such as adjustable poles or elastic cords if sagging begins until a permanent fix is completed.
Installation Recommendations and Best Practices
Getting the installation details right sets the foundation for long-term performance. Whether for residential patios or commercial spaces, accurate setup helps prevent water damage and structural failure.
- 💡 Install with visible directional drainage by setting one corner lower than the others.
- ✅ Use durable support posts or walls that can withstand additional water run-off loads.
- 🚀 Include adjustable tensioning hardware like spring turnbuckles or ratchet tensioners for easy long-term maintenance.
- ⚠️ Use the diagonal diamond tightening method—tighten opposite corners to ensure even tension across the sail.
Common Installation Mistakes and How to Avoid Them
Common errors in sun shade sail installation include improper tensioning, wrong mounting points, ignoring fabric orientation, and poor maintenance. Avoiding these mistakes ensures durability and optimal shade performance.
Installing a sun shade sail can seem simple, but small errors often cause major performance issues later. Understanding the installation basics helps homeowners achieve stronger, longer-lasting shading results.
Understanding Sun Shade Sail Installation
Sun shade sails create protective outdoor coverage by stretching a durable fabric tightly between several anchor points. Tension is the key principle—each corner must be securely fastened and evenly tightened to keep the sail stable.
For a safe and effective installation, homeowners should choose solid attachment sites such as walls, poles, or beams that can bear the fabric’s pull. Proper tension maintains shape and prevents flapping or sagging.
When sails are loosely fitted or installed in improper locations, fabric can tear, fittings may loosen, and overall safety declines. A correct installation sets the foundation for long-term use and consistent performance.
Common Installation Mistakes
Even with quality materials, installation mistakes can impact the shade sail’s efficiency and lifespan. Based on field experience, these are the most frequent issues:
- ⚠️ Insufficient tensioning causing fabric sagging and water to pool during rain.
- ⚠️ Weak or inappropriate mounting points that may fail when wind pressure rises.
- ❌ Ignoring fabric weave direction or skipping manufacturer instructions on orientation.
- ⚠️ Incorrect sail angle that blocks runoff and creates water accumulation.
- ❌ No regular maintenance—over time, connectors loosen and fabric becomes worn.
Each of these problems reduces the shade’s structural strength. A poor setup can also make the sail unsafe in wind or bad weather, especially when tension or slope is ignored.
How to Avoid Installation Mistakes
With careful preparation and the right tools, homeowners can avoid these issues and extend their shade’s service life. Follow these steps during installation:
- ✅ Choose strong, stable, and accessible anchor points—solid beams, poles, or building walls work best.
- ✅ Use turnbuckles or ratchets to apply even tension and remove slack, keeping the surface smooth.
- 💡 Follow fabric orientation guidance printed or labeled by the manufacturer to prevent tearing.
- ✅ Maintain a slope of around 10° to 20° so rain drains naturally and water doesn’t pool.
- 💡 Schedule routine inspections to spot wear, check fittings, and tighten or replace components as needed.
Good preparation ensures stability and visual alignment, helping shade sails perform their weather-resistant function throughout the seasons.
Benefits of Correct Installation
Proper sun shade sail installation delivers several measurable benefits. A well-tensioned, angled sail not only lasts longer but also enhances the comfort and appearance of outdoor areas.
- 🚀 Extended fabric lifespan through reduced wear and stress on corners.
- ✅ Improved UV and rain protection, keeping outdoor areas cooler and more usable.
- 💡 Better safety and stability under high winds or heavy rain loads.
- ✅ Lower maintenance costs and fewer replacement parts over time.
- 🚀 More cohesive visual design that complements patios and yard spaces.
In our experience, homeowners who take time for proper setup see a noticeable difference in the longevity and reliability of their sun shade sail installation.
Maintenance Tips for Longevity
Well-maintained shade sails can last 15 years or more, typically ranging from 5 to 15 years depending on material quality, installation, and environmental factors. Key maintenance includes cleaning, tension management, hardware inspection, and careful seasonal storage.
Shade sails are exposed to sunlight, moisture, and environmental debris year-round. With consistent care and correct installation practices, homeowners can significantly increase their lifespan and maintain their structural integrity.
Key Maintenance Factors and Their Impact
Several elements directly affect how long a shade sail lasts. Paying attention to these factors helps prevent degradation and costly replacements over time.
- 💡 Material Quality: High-grade HDPE and commercial fabrics resist UV damage better than lower-quality options.
- 💡 Proper Installation: Tight fabric tension reduces sagging and water pooling, preventing stress on the fabric.
- 💡 Cleaning Frequency: Routine removal of dirt, mold, and debris prevents fibers from breaking down.
- 💡 UV Protection Reapplication: Recoat surfaces every few years to maintain color and sun resistance.
- 💡 Professional Maintenance: Annual inspections and retensioning preserve tautness and hardware stability.
- 💡 Storage Practices: Always store sails completely dry in cool, shaded areas to avoid mold and decay.
- 💡 Hardware Quality: Stainless steel, corrosion-resistant fittings ensure structural reliability.
- ⚠️ Environmental Stressors: Heavy winds, rain, and extreme temperatures can accelerate wear; reinforced stitching helps mitigate this.
Deep Dive into Installation and Cleaning
Installation quality defines sail performance and reduces mechanical stress. Adequate tensioning ensures a smooth surface that resists sagging while supporting drainage during rainfall.
- ✅ Use proper tensioning to avoid fabric strain and water pooling.
- ✅ Equip the setup with stainless steel turnbuckles and corrosion-resistant hooks for a stable, durable structure.
When cleaning, gentle care helps preserve fabric life. Avoid pressure washers, which can tear or stretch the fibers.
- 💡 Rinse with clean water, use mild detergent and a soft brush.
- 💡 Dry the fabric thoroughly before reinstalling or storage.
- 💡 Remove dirt, mildew, or bird droppings regularly to maintain the sail’s strength and color.
Tension Management, UV Protection, and Storage Tips
Ongoing care practices safeguard both the look and longevity of shade sails. Small maintenance steps performed regularly prevent early degradation.
- ✅ Inspect the shade sail periodically for sagging; get professional retensioning if needed.
- 💡 Reapply UV coating every few years to keep the fabric resilient under constant sunlight.
- 💡 Adjust tension or post positioning seasonally for better stability through temperature changes.
- ⚠️ Before storing, ensure the sail is fully dry to prevent mildew buildup.
- 💡 Store in dry, shaded, ventilated areas using protective covers or bins to reduce heat and moisture exposure.
Common Misconceptions and Professional Maintenance Benefits
Many users assume that once installed, shade sails require minimal attention. This misconception often leads to reduced performance and premature fabric failure.
- ⚠️ Leaving sails up all year during storms or winter can cause permanent stretching or tearing.
- ⚠️ Hanging lights, planters, or décor on the fabric adds unnecessary weight and risks structural damage.
- ✅ Annual servicing by professionals ensures full inspection, retensioning, and early repair detection.
- 💡 Investing in expert maintenance can extend overall sail life, cutting down on replacement costs over the years.
In our experience working with commercial-grade outdoor structures, those who follow consistent shade sail installation and care plans often see product lifespans that exceed the expected range by several years.
Frequently Asked Questions
How tight should a shade sail be?
A shade sail should be tensioned enough to remove wrinkles while keeping some flexibility. Tight tension reduces fluttering in the wind and prevents sagging that can collect water.
When installing, aim for firm tension using a turnbuckle or tensioning device. Each corner should feel taut but not overstretched—similar to a drum surface when tapped.
💡 Tip: Recheck the tension after a few days of sun and wind. The fabric may stretch slightly and need adjustment.
How much slope does a shade sail need for rain?
For proper water runoff, each shade sail should have a slope of around 15° to 20° from one corner to another. The difference in height helps prevent water from pooling in the center.
💡 Tip: If you install multiple sails, alternate the high and low corners so rain runs off efficiently without collecting at connection points.
⚠️ Avoid completely flat sails; stagnant water can stretch fabric and weaken the attachment hardware over time.
Can I attach a shade sail to my fascia board?
Attaching a shade sail directly to the fascia board is not recommended. The fascia alone isn’t designed to bear the tension and wind load of the sail.
If you want to connect to the fascia area, reinforce the structure by fixing the hardware into the roof rafter or installing a separate fascia support bracket that redistributes the load.
💡 Consider adding a dedicated post near that corner to ensure long-term stability and prevent structural damage to the home.
What hardware do I need for a shade sail?
Most installations need marine-grade stainless steel fittings to ensure strength and corrosion resistance. The standard hardware kit includes:
- ✅ Turnbuckles or tensioners for precise tightening
- ✅ Pad eyes or eyebolts for fixed anchor points
- ✅ D-shackles or snap hooks to connect corners
- ✅ Lag screws or expansion bolts for secure mounting
💡 Always match the hardware strength to the size and area of your sail. Larger sails often need thicker fittings rated for outdoor load-bearing use.
How to install a post for a shade sail?
Use galvanized steel or powder-coated posts for durability. Each post should be installed in a concrete footing with the correct depth for stability.
- ✅ Dig holes 600–1000mm deep depending on post height and soil firmness.
- ✅ Angle posts slightly away from the sail center (about 5°) to counteract tension forces.
- ✅ Fill the hole with concrete and let it cure for at least 24–48 hours before attaching tension.
💡 For heavy-duty commercial setups, consider embedding metal sleeves so posts can be removed or replaced easily without disturbing the base.
Final Thoughts
A successful sun shade sail installation depends on accurate measurements, solid anchor points, balanced tension, and well-planned slope. These steps prevent common issues like water pooling, fabric tearing, or structural stress, while proper material selection and consistent maintenance extend the sail’s lifespan. Clean installations and routine inspections ensure safety, durability, and consistent performance through varying seasons.
By taking a methodical approach and using quality hardware, homeowners can create shade solutions that combine style and resilience. Working with dependable suppliers or professionals simplifies compliance, protects investments, and delivers a long-term outdoor space designed for comfort and lasting value.