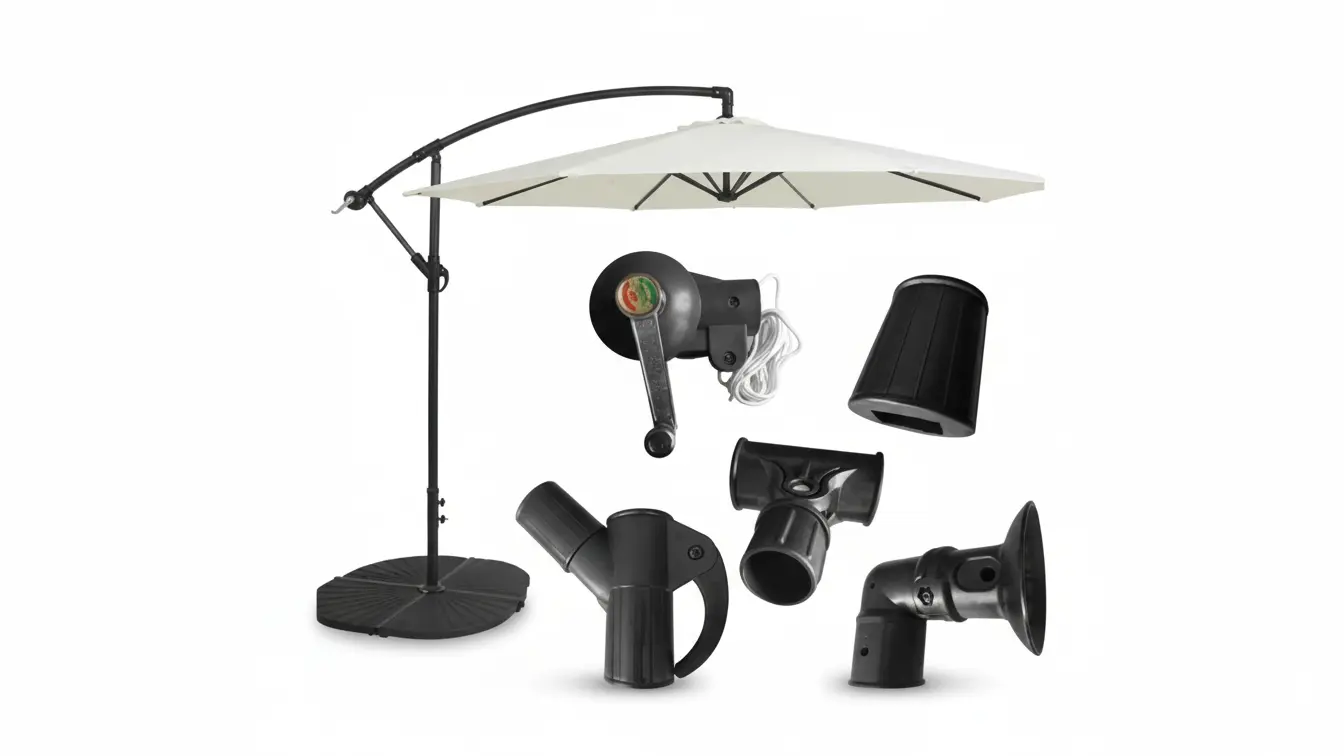
Every umbrella lift system works hard behind the scenes, and the way it fails usually comes down to the hardware inside the pole. Rope-and-pulley lifts and crank-driven drums handle load, friction, and wear in completely different ways, so they leave you with very different maintenance tasks over the life of the umbrella.
This guide looks at how each mechanism moves the canopy, where it tends to break, and what you actually deal with when you repair or replace parts in real commercial use. With that context, you can choose a lift system that fits your maintenance schedule, tooling, and long-term cost targets instead of focusing only on the initial purchase price.
Rope vs Crank: Key Mechanical Differences
Rope systems multiply force with pulleys but lose efficiency to friction. Crank systems use direct-winding gears, avoiding pulley-related friction and rope strength degradation from sharp bends.
Operating Principles: Pulleys vs. Geared Drums
A rope-and-pulley system creates mechanical advantage by distributing a load across multiple strands of rope. Looping a rope over a single movable pulley, for instance, splits the load in half, delivering a 2:1 mechanical advantage. You pull with half the force, but you have to pull twice the length of rope.
Crank systems operate differently. They use a geared mechanism connected to a rotating drum. The mechanical advantage comes from the gear ratio, not from distributing the load across rope strands. This provides consistent torque as the rope is wound directly onto the drum.
Efficiency, Friction, and Strength: A Quantitative Comparison
The primary distinction in performance comes down to friction and material stress. Rope systems suffer from compounding issues that don’t affect direct-wind crank mechanisms.
- Pulley Friction Loss: Every pulley in a system introduces a 5-15% efficiency loss from friction and the energy it takes to bend the rope. A theoretical 3:1 system, after accounting for these cumulative losses, delivers an actual mechanical advantage closer to 2.57:1.
- Rope Strength Derating: The sharp bend a rope makes around a pulley sheave creates uneven stress, stretching the outer fibers while compressing the inner ones. This can reduce the rope’s breaking strength by as much as 50%.
- Crank Advantage: By winding rope directly onto a drum, crank systems completely bypass both the compounding friction loss from multiple pulleys and the major strength reduction caused by sharp bends.
Installation Complexity & Initial Setup
Pulley installation complexity hinges on precise component alignment to manage stress within ANSI/CEMA limits. The right hub and strict mounting procedures are non-negotiable to prevent failure.
Component Selection and Stress Management
Getting the installation right starts with selecting the right components based on load requirements, environmental factors, and the pulley’s position in the system. Hub selection is a critical decision point. Integral hubs—either flat or contoured—minimize weld stress concentrations but demand much higher precision during alignment. While weld-on hubs are a lower-cost option, they are more prone to failure in the heat-affected zone near the weld. An improper choice creates stress concentrations that lead directly to premature system failure.
Technical Standards and Mounting Procedures
A successful installation isn’t about guesswork; it’s about adhering to established engineering standards. Key technical requirements are non-negotiable to ensure reliability and safety.
- Governing Standard: All sizing for pulley and shaft diameters must follow ANSI/CEMA B105.1-2003.
- Stress Limits: Bending stress cannot exceed 8,000 psi, and stress in the pulley wall is capped at 10,000 psi.
- Bore Tolerance: For keyed hubs, the bore tolerance is specified at +.003 to +.005 inches to account for potential weld distortion.
- Mounting Protocol: Use shaft keys without any lubrication to maintain proper friction, and always secure the final assembly with set screws.
Daily Use: A Question of Convenience
For daily use, convenience means less maintenance. This is achieved with designs like split pulleys for easy swaps and durable materials like thick steel rims (0.375”+) that last longer.
In high-frequency operations, what seems convenient on paper can become a maintenance nightmare. True convenience is designed in, focusing on components that reduce service frequency and simplify replacement when it’s finally needed. It’s a combination of smart architecture and brute-force material strength.

Designs Prioritizing Low Maintenance and Quick Swaps
When a pulley runs all day, the last thing you want is a complex, time-consuming repair. The best designs focus on uptime by making service faster and less frequent.
- Split Pulleys: These feature bolted halves, allowing replacement directly on the shaft without a full system teardown.
- Dead Shaft Pulleys: By using keyless locking and through-shaft lubrication, these designs minimize contamination, a major cause of failure in high-cycle zones.
- Larger Sheaves: Size matters for friction. Swapping from a 2-inch to a 3-inch sheave can cut friction by up to 50%, reducing wear and operational effort.
- Simpler Systems: Fewer moving parts (bearings, bushings) mean fewer failure points. For high-traffic applications, simplicity often beats complexity.
Material and Component Specifications for Durability
Durability isn’t an accident. It’s engineered with specific materials and construction methods designed to withstand constant abuse, from belt tension to abrasive material impact.
- Thick Steel: Heavy-duty drum pulleys use rims at least 0.375″ to 0.5″ thick and reinforced end discs up to 1.25″ to handle constant belt tension without deforming.
- Abrasion Resistance: Quarry Duty wing pulleys employ massive 0.75″ x 2″ AR400 steel contact bars and 0.25″ gussets to fight abrasion and prevent wings from folding under load.
- Shock Absorption: Impact idlers are fitted with 60 durometer rubber discs. Their specific job is to absorb shocks from material loading, protecting both the belt and the pulley structure.
- Deep Welds: Techniques like double sub-arc welding are used to achieve maximum penetration and structural integrity, reducing the risk of fatigue failure from heavy daily cycles.
Your Direct Source for Custom Commercial-Grade Patio Umbrellas

The Long-Term Maintenance Burden
The 75% rule guides repair-vs-replace decisions. When repair costs hit 75% of replacement value, it’s time to replace. CMMS data and component standards are key.
| Factor | Guideline / Impact |
|---|---|
| Repair vs. Replace Threshold | Replace asset when repair costs exceed 75% of its replacement value. |
| Preventive Maintenance | Extends equipment lifespan by 20-50% and reduces emergency repairs. |
| CMMS Alerts | Automates decision support alerts when repair costs approach the 70-75% threshold. |
| Environmental Control | Mitigates accelerated corrosion caused by high humidity and temperature. |
Economic Thresholds: The Repair vs. Replace Decision
Deciding whether to repair or replace an asset is a straightforward economic calculation, not a gut feeling. The goal is to minimize total cost of ownership (TCO) and avoid the cascading costs of unexpected downtime. Running equipment to failure is never a viable strategy.
The industry standard is the 75% rule: if repair costs exceed 75% of an asset’s replacement value, you replace it. This threshold prevents throwing good money after bad. A disciplined preventive maintenance schedule directly supports this by extending equipment lifespan by 20-50%, pushing back the date when that 75% threshold is even a possibility.
Ignoring this discipline leads to higher TCO, creates safety hazards, and can trigger non-compliance fines from bodies like OSHA.

Data-Driven Management and Mitigation Factors
Effective maintenance isn’t just about turning wrenches; it’s about managing data. A Computerized Maintenance Management System (CMMS) is the central ledger, tracking asset history, costs, and downtime. The system automates the 75% rule by flagging assets when repair costs approach that threshold, providing the objective data needed for a replace-or-repair decision.
Beyond software, physical and environmental factors directly influence asset longevity. Ignoring them is a common and costly mistake. Key mitigation factors include:
- Component Standards: Adhering to strict standards, like using certified parts or alloy-specific welding for pressure vessels, prevents systemic failures and ensures components perform as specified.
- Environmental Controls: High humidity and extreme temperatures accelerate corrosion and component degradation. A proper maintenance plan must include climate control and optimized ventilation to protect assets.
Repair Scenarios: What Breaks and How to Fix It
Common failures are pulley wear >0.4mm, misalignment, and incorrect tension. Use TEXROPE gauges for inspection, a LASEr At-1 for alignment, and re-tension belts within 48 hours.
| Failure Mode | Diagnostic & Corrective Action |
|---|---|
| Pulley Groove Wear | Use TEXROPE® pulley gauges to measure V-groove wear. Replace any pulley where the wear exceeds the 0.4 mm threshold. |
| System Misalignment | Use a LASEr At-1 laser alignment device to confirm motor and driven shafts are perfectly parallel and correct any deviation. |
| Incorrect Belt Tension | Re-tension the drive during the initial 24-48 hour run-in period. If belts slip under peak load, re-tension immediately. |
| Component Contamination | Before installing new belts, clean pulleys, motor mounts, and take-up rails with a non-volatile solvent. Never sand or scrape grooves. |
| Damaged Tensile Members | Always install belts by moving the take-up rails. Never force or pry a belt onto a pulley, as this snaps the internal tensile cords. |
Understanding the Root Causes
Most belt drive failures are predictable and preventable. They aren’t random events. Pulley grooves wear out from prolonged use or in abrasive environments, which prevents new belts from seating correctly and leads to slippage. Misalignment is almost always an installation error—either the shafts aren’t parallel or the mounting surfaces are tilted. This introduces vibration that kills both belts and bearings.
Similarly, incorrect tension is a rookie mistake. Too much tension overloads bearings and shafts, while too little causes the belt to slip and glaze over, especially under high startup loads. Finally, debris is a silent killer. Rust or grime on take-up rails can prevent proper tensioning, and contaminants in pulley grooves will shred a new belt quickly.

The Repair and Maintenance Protocol
A solid maintenance schedule is non-negotiable. For critical drives, perform a quick visual and listening check every two weeks. For normal drives, monthly is fine. A full shutdown inspection should happen every 3-6 months. This is when you get out the tools—check pulley grooves with the gauges, verify alignment with the laser, and inspect guards for rubbing.
When replacing belts, your first step is to inspect the old ones for unusual wear patterns. This tells you if there’s a deeper design problem. Before installing the new set, clean everything. Check motor mounts and take-up rails for tightness, and ensure bushings are torqued correctly. For QD and XT bushings, retighten the bolts to spec weekly for the first month, then check them periodically after that.
Cost Over a Lifetime: Upfront vs. Ongoing Expenses
The initial purchase price is small compared to lifetime costs. Proactive maintenance cuts long-term expenses, which can be 15-70% of production value, by preventing expensive downtime.
Focusing only on the sticker price of a commercial asset is a classic mistake. The real financial impact comes from the total cost of ownership (TCO), which is dominated by what happens after the equipment is installed.
Defining Upfront Investment vs. Total Cost of Ownership (TCO)
The upfront cost is the one-time capital expenditure to acquire the asset. It’s the most visible number, but it’s only the beginning of the story.
Ongoing expenses include every cost incurred during the asset’s operational life. This covers direct repair costs like spare parts and labor, scheduled maintenance, and requalification after a severe failure, such as extra cleaning or calibration. TCO combines the upfront price with all these ongoing expenses to give a true measure of an asset’s value.
A reactive “run-to-fail” maintenance strategy results in the highest long-term costs. It creates a cycle of expensive emergency labor, unplanned spare parts acquisition, and cascading damage to other components.
Data on Maintenance Strategies and Financial Returns
The financial case for proactive maintenance is clear. The numbers show a massive gap in outcomes between reactive and planned strategies.
- Predictive Maintenance ROI: This approach delivers a 5-15x return, reducing unplanned downtime by 48.5% and defects by 63.2% compared to reactive strategies.
- Preventive Maintenance Savings: In one analysis, a compressor under a preventive plan had a 30-year Net Present Value (NPV) that was $6,359 lower than a unit maintained reactively.
- Operational Impact: Across industries, maintenance costs can represent 15% to 70% of the cost of goods produced, often far exceeding the initial equipment price over its lifetime.
- National Scale: In the U.S. alone, total annual manufacturing maintenance costs and related losses average $222 billion.
Our Recommendation for Your Use Case
For peak reliability, maintain pulley alignment within 1/4° (or 2.5 mm per 500 mm) and stick to a consistent, scheduled inspection routine.
Implement a Proactive Inspection Schedule
A routine check-up is the cheapest insurance you can buy. Problems start small—a bit of wear, some debris—and a regular inspection schedule catches them before they become catastrophic failures.
- Visual Checks: Inspect critical drives every 1-2 weeks and standard drives monthly. Look for groove wear, debris, or obvious damage.
- Belt Installation Prep: Before installing a new belt, make sure the pulleys are completely clean, dry, and free of nicks or damage.
- Lagging Maintenance: For lagged pulleys, monitor their condition constantly. Make immediate local repairs to stop any damage from propagating across the surface.
- Component Health: During each inspection, check the pulley bearings, shafts, and belts for any signs of wear.
Adhere to Strict Technical and Tensioning Tolerances
Getting “close enough” isn’t good enough. Small deviations in alignment and tension create massive stress on components, leading directly to premature wear and failure. Stick to the engineering specs without exception.
- Alignment Tolerance: Maintain pulley alignment within a strict tolerance of 1/4° or 2.5 mm per 500 mm of drive center distance. This prevents uneven belt wear and component stress.
- Correct Tensioning: Always use the manufacturer’s suggested tensioning tools. Under-tensioning causes slippage, and over-tensioning puts excessive stress on bearings.
- Bushing Torque Checks: After installation, retighten bushing torque bolts (e.g., QD, XT) weekly for the first month, then follow the periodic schedule in the manual.
- Safety Compliance: For any relevant installations, ensure you meet safety standards, like the OSHA requirement for a permanent belt shifter on tight/loose pulley systems.
Final Thoughts
A rope lift and a crank lift both move the same canopy, but they shape your repair work in very different ways over the life of the umbrella. Rope systems stack up friction and stress at every bend, while crank mechanisms concentrate wear inside a sealed gear and drum assembly that you can service in a more controlled, repeatable way.
When you look at real failures—grooves that wear past tolerance, cords that flatten and fray, gears that lose smooth engagement—you see how much your choice of mechanism drives labor hours, parts spend, and unexpected downtime. Use those patterns, along with your team’s skill level and inspection rhythm, to choose the lift system that feels easy to maintain day after day instead of chasing the lowest upfront price.
Frequently Asked Questions
How do you replace the cord in a cantilever umbrella?
Replacing a cantilever umbrella cord involves removing the canopy, disassembling the crank mechanism, and threading a new cord through the frame using a guide wire. You’ll need Allen wrenches and a screwdriver. 550 paracord is a recommended replacement material.
Are crank umbrellas reliable for commercial use?
Yes, commercial-grade crank umbrellas are highly reliable. They are engineered to withstand winds up to 45 mph, offer UPF 50+ to 80+ UV protection, and often have 3-5 year warranties when secured with a base over 66 lbs (40 kg).
Which type of umbrella is easiest to repair?
Aluminum-framed umbrellas are the easiest to repair. Their lightweight design, high rust resistance, and simple components allow for straightforward maintenance like tightening bolts or lubricating hinges, making them ideal for high-traffic commercial areas.
How should you maintain an umbrella’s mechanical parts?
Clean joints and hinges regularly to remove debris. Apply a silicone spray or machine oil lubricant to moving parts like runners and sliders monthly to ensure smooth operation and extend the umbrella’s lifespan beyond two years.